
In the first part of this series last week, I talked about what should and should not go into your actor resume. This week, I want to show you how to format your resume content so that (a) it looks professional and (b) grabs the attention that it deserves. You should know that I use Microsoft Word on a Mac to edit my resume. You’ll have to translate these instructions to your computer setup if you use something else. Thankfully tools in all text editing software are pretty similar. Alright, here we go!
YOUR INFO AND STATS, FRONT AND CENTER
Or left-justified. Or right-justified.
I mentioned this already last week but make sure that your name at the top of the page is big enough that it can be easily seen from a few feet away. The conventional placement of your name is in the center, but these days you can also place it to the left or the right, particularly if your name is kinda long. Union affiliations, contact information, and stats should go right under your name in the same font size as the rest of your resume. Justify (align) this text to match what you’ve got going on with your name above.
GET DOWN WITH TABLES
The biggest mistake actors make on their resumes is to not use tables to format their credits. In the last post, I said that your res’ will be skimmed in 0.3 seconds. That’s not a lie. The easiest way to make that skimming work for you is to make sure all everything is lined up nicely and make for an easy read. This does NOT mean hitting the space bar exactly 23 times between each word! Oh, Lordy, no. This means a you create a TABLE.
Practice making tables on a clean document, not your best saved acting resume. It’s important to get tables right, and there are lots of things that could leave you crying in despair if you’re unfamiliar with tables. Save yourself the tears and practice first until you get the hang of it.
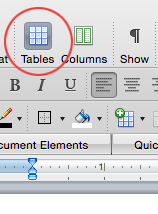
In Word, the table feature usually has a little checkerboard icon. If you use Pages, Open Office, or something else to format your resume, you’ll have to look for an icon that looks like this:
First, make a table that has three columns and three rows. That will be enough to practice with. When you create your table, you’ll often get a bigger checkerboard area where you can “drag” out the number of columns and rows you want. Make sure you stick with three columns, but you can go crazy with the number of rows if you feel like it. We can delete any extras later.

Now that you have your table, you’ll want to remove the borders. Huh? That’s right, tables by default have lines, or borders, on all sides of them. What we want for your resume is a border-less table, so your credits can be lined up neatly but without all those criss-crossing lines that will be a distraction. In Word, you can edit the table you’ve just created by clicking on it, and then clicking on the crosshairs icon that will show up in the upper-left side above the table. (See the screenshot below.) This is where gets interesting.

Double-click on those crosshairs, and a whole new world will open up for you: a world of Table Properties. From here, we can click on the Borders and Shading button to get rid of those pesky borders.
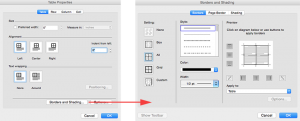
Now, look for a setting that says “None”. Click it. Then rejoice. You have just removed your borders from your table.
ENTER YOUR CREDITS LIKE A BOSS
Since you’re rocking the table, it’s time to fill it in with your equally rocking credits. You’ll want to make the first row of your table a “heading” row for your first section. Examples of sections would be: Film, TV, and Theater. Type the heading in bold (and possibly in all uppercase) in the very top left table cell.
In the next row, write out the name of either the film, series, or show you were in appropriate to that section. Remember, you want to list no more than three to five of your best work. Next, move to the table cell in the middle and type in your role. If it’s a film, TV, or web credit, the industry standard is to put Lead, Supporting, or Co-Star (which, despite popular belief, does NOT mean you are a lead) rather than the name of your role (“Becky the Cheerleader”). For theater credits, though, you can put your character’s name, and maybe add Lead, Supporting, or Co-Star in parentheses if the show isn’t well-known. In the third and final column, enter the production company, director, producer, theater, or TV network. I know that’s a lot of options. Basically, list the most-known person or organization responsible for that project. For example, if you were in a show at the Guthrie with a no-name director, I would suggest that you skip the director and list the Guthrie. Can you put down the director and theater (write it out like this: director / theater)? Or director and production company (director / production company)? Sure thing, special snowflake. Remember, this is about starting a conversation. And nothing starts a conversation better than, “Oh! You worked with so-and-so! I went to grad school with her. Tell me about that project!”
Leave a blank row between each of your sections. Remember that nice white space I talked about last week? Yeah, we want that here too.
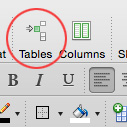
“What if I Run Out of Rows?” you say? Good question! This can be a bit tricky, so keep breathing if it gives you trouble. Use your mouse to highlight the last row that you have. When you highlight this row, that checkerboard icon that helped you make a table in the first place will turn into a weird little group of boxes and arrows with the word Tables under it. See the screenshot, since I have no idea how to describe this. Needless to say, this is the magic row and column insertion button, and when you click it you’ll get the option to add — you guessed it — either a row or a column. Add rows to your heart’s content.
What if you want to delete a row? Highlight that row with your mouse and then right-click. Choose the “Delete Cells” option, and then choose “Delete entire row”. You are a now table master! Make sure you save your work, because you do NOT want to have to do that over again!
YOU GOT SKILLZ
And training too, right? Refer to part one of this series for the content that should go here. As far as formatting goes, training and skills can be listed in paragraph form rather than in a table.
TURN THAT SHIZZLE INTO A PDF
You did it! You formatted an excellent, professional-grade acting resume! Congratulations! Crack a beer! BUT ONLY AFTER YOU HIT SAVE. For the love of all that is holy, save, save, SAVE. In Word, you can save your file as a .doc or .docx file. But the best way to preserve your beautiful new formatting is to save as a PDF.
How do you do this? Head on over to part three (don’t fret — it’s the last part, and super short).
